terriko: I am a serious academic (Twlight Sparkle looking confused) (Serious Academic)
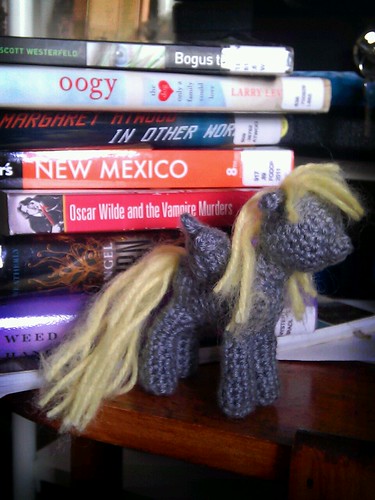
I'm working on a few other projects that are secret 'cause they're presents, but this one's a present that the recipient is expecting, so you get to see her now:

Violet Pony for KatieViolet Pony for KatieViolet Pony for KatieViolet Pony for KatieViolet Pony for Katie

I'm still waiting to hear from Katie to see if she needs any adjustment or whether the colour is what she had in mind, but it's nice to have another pony done!

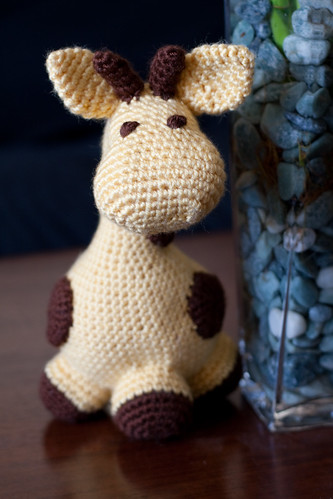
Giraffe!

May. 12th, 2012 05:44 pm
terriko: Yup, I took this one. The eyes are paper, not photoshop (chair)
I saw this giraffe pattern on Ravelry and knew I had to try it for the next person with a baby on the way... and a few weeks later one of my colleagues announced that his wife was pregnant with their first kid!


I'm absurdly early -- the kid's not due for another 5 months or so -- but this worked up really quickly. Now I need to decide if I should give it to him right away and then have an excuse to make something else if the lab decides to do a shower, or if I should wait so I don't look a little obsessed.

... Oh wait, everyone in the lab watches me crochet/knit constantly during meetings. I guess he gets the giraffe on Monday. ;)
terriko: (Default)
As many of you know, I've been working on a pattern for making pones based on My Little Pony: Friendship is Magic.

I finally sat down and stuck the pattern and the pictures together, so now you can all make ponies! And best of all, the pattern is free! (This is mostly 'cause I'm that kind of person, but it is complex for me to sell anything due to the conditions of my work visa here in the US. Which is to say please don't ask me if I can sell you a finished pony; I can't.)

The pattern as a pretty printable PDF
The pattern in HTML
The pattern on Ravelry
The pattern on DeviantArt (No good reason for this except that there's lots of bronies there and I might as well share where the community is!)

And to remind you, here's what you'd be making:


More photos here.

I'm really nervous about this because it's the most complex pattern I've ever posted online and because I know other people really want it. I hope people enjoy it!
terriko: Adorable icon care of John (bubble bobble)
For PAX East last year, some friends and I made a bunch of Angry Birds, which resulted in a great many games with strangers and a lot of fun. I've taken a smaller set of birds out to a few other conferences since, and when I was hanging out with some open source folk, I developed a penguin ball to toss around with the Angry Birds. At my last conference, Pycon, I crocheted up a couple of little ones to give away to my fellow GNU Mailman developers:


Small Penguin Ball


Crochet Instructions:

I use Red Heart Super Saver yarn with a K hook, but anything would do.

Start with white yarn
0: Make a magic ring (6)
1: incr in each stitch (12)
2: {incr, sc} x 6 (18)
3-4: sc around (18)
Switch to black yarn
5-7: sc around (18)
8: {decr, sc} x 6 (12)
Stuff (I use pillow stuffing 'cause pillows were on sale and fiberfill was not)
9: decr around (6) and finish off. Tuck ends in.

Wings (make 2):
Make a magic ring using 7 dc (start with one sc to get you up there), but pull it into a half-circle instead of a full circle

Eyes (make 2):
In White: 0: magic ring (5)
In Black: tie a big knot, thread it through the center of the magic ring. (I chain 3 and then tie that in a knot to make it big enough)

Beak:
0: magic ring (7) fold in half and sew together a little bit when you sew it on the penguin.

Basically, take all those things and sew them on the ball. I hide the join for the black and white body under one of the wings.
terriko: (Default)
Teensy Amigurumi Bunny

I bought some baby yarn to finish out a bunny hat I was making for [personal profile] krayola 's daughter, and enjoyed the feel of it so much that I figured I should make something small. Very small. The bunny is about the size of my thumb. So I don't forget, here's the pattern I made up as I went:

Teensy Bunny (Amigurumi)


Row 0: Magic ring (6 total)
Row 1: 2sc in each ch (12 total)
Row 2: {1sc, 2sc in one ch} * 6 (18)
Row 3-6: sc around (18)
Row 6: {1sc, decr} * 6 (12) // this makes the neck

Stuff the body. I left a puff of stuffing sticking out as a tail.

Row 7: {2sc in one ch, 1sc} * 6 (18) // starting the head. I think I did some extra 2sc by accident
Row 8: sc around (18)

Stuff the head.

Rest: decr around until closed

Ears (make two, unless your bunny is actually a unicorn): ch 6, then carefully run the yarn back through the chains to add volume and make it so you have two threads on one side so you can fasten.

Fasten the ears to the head and embroider eyes, nose if you want.

Happy spring!

Teensy Amigurumi Bunny

Profile

terriko: (Default)
terriko

May 2025

S M T W T F S
    12 3
456 78910
11121314151617
18192021222324
252627 28293031

Syndicate

RSS Atom

Most Popular Tags

Style Credit

Expand Cut Tags

No cut tags
Page generated Jun. 9th, 2025 11:42 am
Powered by Dreamwidth Studios